You must be a MyPeek member to download our extensibility solutions. Click here to learn more about the benefits of membership and find out how to sign up for free.
If you are already a member please login to download the file. If you are not a member, register now for free.
Category : Plug-Ins
Submitted By : Chris Bloom
Downloaded : 644 Times
Rating : 5 of 5
View Comments (3)
You have probably done this: connect OmniPeek up to a busy network and take a look at the Peer Map. On our core router, here is what I get after about 10 seconds:
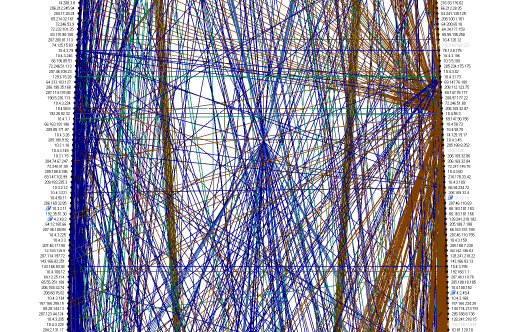
Wow! What a mess! You may be wondering how I got all that traffic, sitting at my desk somewhere in the engineering department subnet. Well, I used the amazing Remote TCPDump Adapter to capture and stream traffic from a linux box that is connected to the core router. But I digress. Now where was I...
Ah yes, what a mess! This massive spider web is impressive, but not very useful. What I would like to do is group all those nodes into subnets, and that is what the SubnetMap Plug-in does.
After applying the SubnetMap Filter with two pre-defined subnets, one for the internal traffic, and one for the external traffic, here is what I get:
Figure 2
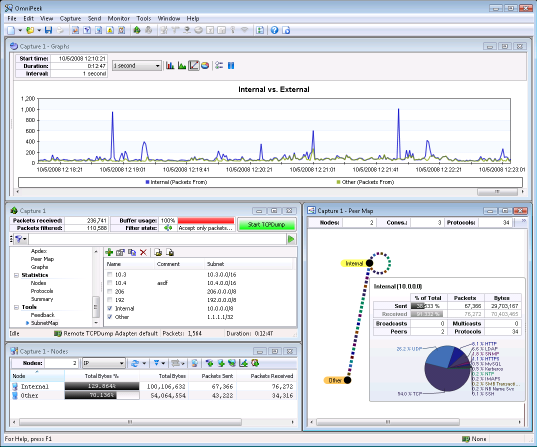
That's better, don't you think? Now we can see the forest from the trees. In this view I have also defined a graph to correlate the internal and external traffic.
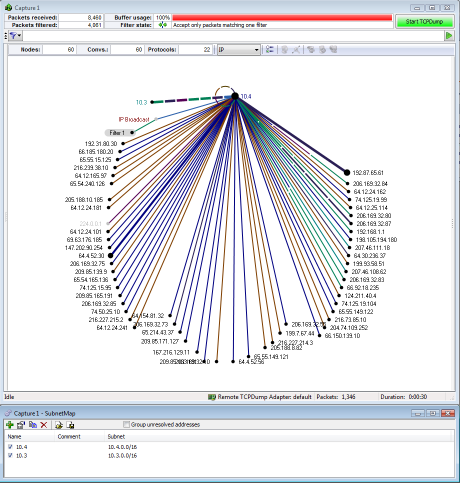
Below is an example of grouping the internal traffic, but not the external traffic:
Figure 3: Peer Map with subnets
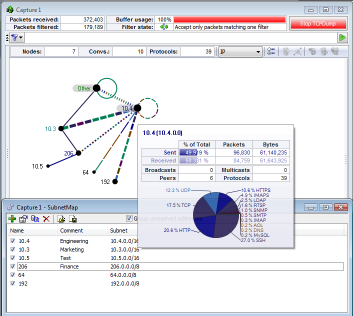
And finally, here we defined a couple of subnets that we need to monitor:
Figure 4
How we do it The Subnet Map Plug-in is an advanced filter plug-in. In order to enable the plug-in, an advanced filter must be created and enabled, as shown below:
Figure 5: Create Advanced SubnetMap filter
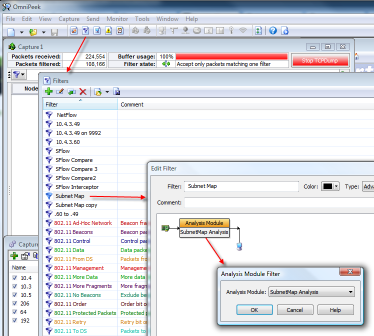
The SubnetMap Plug-in changes the IP addresses of incoming packets to match the SubnetMap filters defined by the user. To define a Subnet Filter, create a capture, go to the SubnetMap Tab, and create a new entry as shown below:
Figure 6: Define Subnet filters
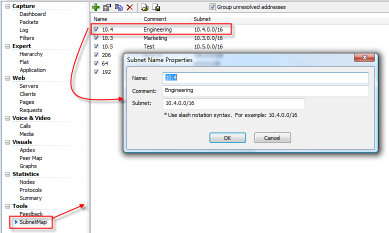
It is important to use slash notation. For example, if you want to define a subnet that groups all traffic in the 10.4 network then specify 10.4.0.0/16. This says to use the upper 16 bits of the address is the subnet, or mask. If you want to group everything in to the 10 network then use 10.0.0.0/8.
Using Subnet Map Plug-in on File Captures
Here is the process for applying the SubnetMap Plug-in to a File Capture using PeekPlayer :
- Open the file capture (C1)
- Open a real-time capture on any adapter (C2)
- Enable SubnetMap Filter in C2
- Enable Subnets in C2 SubnetMap Tab
- Send packets from C1 to C2 using PeekPlayer
- Reprocess All Packets from the Edit Menu
Subnet Map Best Practices
The SubnetMap Plug-in filters incoming packets, changes the IP addresses of packets that match the enabled subnet filters, inserts the altered packets, and drops the original packet. When using the SubnetMap Plug-in the packets themselves are not going to be very useful. The point of the SubnetMap is to provide high level statistics about subnets, not to do packet analysis of packets in those subnets.
In order to use the Subnet Map Plug-in most effectively, you will probably want to create 2 captures. One capture is for the Subnet Map, and the other is capturing all the traffic, and saving it to disk. That way if an anomaly occurs and is noticed in the Subnet Map, the full capture can be used to drill down into the specific unaltered packets.
You should also turn off the Expert from the Performance Tab, as it is not going to be very happy about the altered packets.
What's New in Version 2.0.0.1
Introduced the capability to process packets and update summary statistics for the following:
- Inbound traffic to a subnet
- Outbound traffic from a subnet
- Total (inbound + outbound) traffic of a subnet
- Note: In this version, an advanced SubnetMap filter is not needed to get the summary statistics. But if you would still like to see grouped packets (with source or destination IP addresses modified to the subnet defined) in the packet list, then you still need to utilize the subnet filter.
fig 7: Example subnet definitions in SubnetMap tabfig 8: Summary stats for defined subnetsfig 9: Subnet Summary Stats Graph
- Functions:
- Specify subnets in the SubnetMap tab. (fig 7)
- Start capturing
- Go the the Summary stats tab and will see the subnet traffic stats are generated. (fig 8)
- Why this is useful:
- Make it very easy to compare the network utilization of different subnets. This information can be very useful when an organization is considering to redesign/rebalance a network.
- Leverage Powerful Graphing Engine in Summary Stats:
- Since it is in the summary stats, you get the graphs for free. (fig 9)
Support
If you have any feature requests or questions about this plug-in please post them to the MyPeek Developers Forum,
History
Version 2.0.0.1 11/02/2012
If you have any feature requests or questions about this plug-in please post them to the MyPeek Developers Forum,
History
Version 2.0.0.1 11/02/2012
- Support Summary Statistics & Graphs
Version 1.0.0.2 10/6/08
- Fix for Monitor Capture
Version 1.0.0.1 10/6/08
- Release to MyPeek
Comments
Does this support OmniEngine?
Posted by: Matthew Iwema on Monday, April 7th, 2014 at 1:33 PM
Yes, the subnet plug-in is fairly simple and has no UI of its' own. I think it would be fairly easy to port it to the OmniEngine. I will add it to the list.
-Spacepacket
-Spacepacket
Posted by: Christopher Bloom on Tuesday, April 20th, 2010 at 9:59 AM
Could this be modified to work on the OmniEngine directly?
Posted by: Andy Faulkner on Wednesday, February 24th, 2010 at 8:54 AM


