Introduction
According to Wikipedia, automation is the use of control systems, such as computers, to control processes, replacing human operators. In the case of network analysis, there are three very good reasons why a company or an individual might want to invest in automation:
- Provide reproducible consistent results
- Save time and money
- Increase revenue.
Consistency
One good reason to invest in automation is consistency, which provides the ability to reproduce test results on demand. By automating a process, baselines can be generated that provide thresholds for success and failure. Once a process is automated, results can be easily reproduced that are compared against the baseline. Further automation can be implemented to compare the results and generate notifications on failure. From there, other automation can be used to react to the notifications. The opportunities for automation are endless, and the savings in time and potential for increased revenue make it well worth the effort.
Time
By definition, every process that is automated, no matter how simple or complex, replaces the need for a person to manually perform that process. This saves time, and not just once, but every time that automated process is performed. And in most cases, the people who are performing these processes are well educated and well paid engineers, making the savings in time significant, which also translates into a savings of money.
Revenue
Second, the amount of time a person saves through the implementation of an automated process allows that person to perform other tasks that could not have been otherwise performed. And in the case where the newly available time is invested in the automation of another process, a wonderfully vicious cycle is created where the time is continually applied to automation. This type of innovation leads to new products and services, and increased revenue.
Case Study
Bob works for a large device manufacturing company. This company designs and manufactures wireless devices, and lots of them. When a new wireless device comes off the production line, it has to go through a series of tests. Each of these tests is conducted at a different test station. Each station is equipped with the tools necessary to test the device, as well as a LiveAction RFGrabber that is used to collect all the wireless data that occurs in the area during the test. The packets that are captured using the RFGrabber are saved along with the other data collected from the test. If the test fails, the packet trace can be analyzed for clues. One data point that is often looked at is the number of CRC errors that occurred during the test. A high rate of CRC errors can be indicative of a bad radio or interference from other wireless devices in the area.
In order to save time and money, the company has asked Bob to automate the whole testing process. The goal is to test the devices from start to finish without any human intervention. The testing facility is actually a clean room where a robot is used to perform the tests. To do this, the robot carries a device from station to station. At each station, the robot runs the device through a series of tests. The tests are executed and the results of the test, including the packets captured using Omnipeek, are saved away.
Bob is an engineer that is familiar with Omnipeek. He also knows that Omnipeek has an automation API that he can use to automate the packet capture portion of the test at each station. Before each test starts, a script is run to automate the capture of wireless traffic in the test area. The script is a Visual Basic Script that automates the functions of an Omnipeek Console using the Omnipeek Console Automation API. The script is used to automate a single instance of the Omnipeek Console which is connecting to and controlling the RFGrabbers at each station to collect the data. All of this is done using the Omnipeek Console Automation API, and although it is very functional, it is just one example of how Omnipeek can be automated.
Architecture
LiveAction Omnipeek Platform provides APIs for automation as well as analysis. As the diagram below illustrates, these APIs are available for both the Omnipeek Console and the Capture Engine.
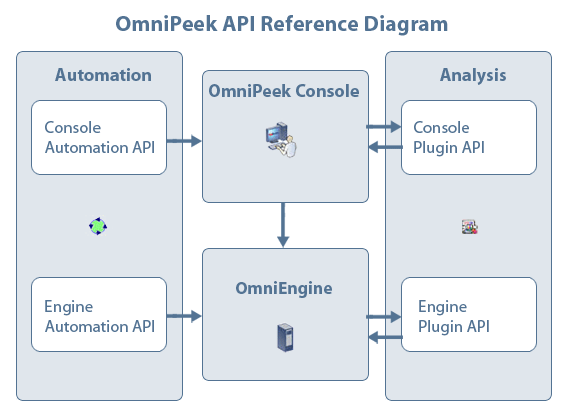
In the diagram, the Omnipeek Console and the Capture Engine are shown in between the Automation API on the front-end, and the Analysis. APIs on the back-end. This primer focuses on the automation APIs on the front-end. If you are interested in writing plug-ins that perform analysis on the back-end, please refer to the LiveAction Plugi-n Primer.
Languages
The automation APIs provided on the front-end include the Console and Engine APIs, and are both Microsoft COM APIs. This means they are language independent APIs, and can be used from any language that has COM bindings. Languages that support COM include, but are not limited to:
- Visual Basic
- Visual Basic Script
- Active Perl
- PHP
- .Net
- C/C++
Functions
Both the Console and Engine automation APIs can be used to perform the functions shown below.
- Create a capture
- Start a capture
- Stop a capture
- Save a capture
- Save a report
- Get Summary Statistics
The simplest functions, like the ones shown above, are easy to automate in both the Console and the Engine using the automation APIs. The Console API is very simple and consists of about 10 features, including the ones shown above. This makes it easy to start automating console operations quickly. The Engine API can be used to perform most of the functions of the Console API as well as many others. For example, the Engine API can be used to retrieve both node and protocol stats.
Console Automation
By far, the easiest way to get started in automation is through the use of Visual Basic Script because it is an integral part of the Windows XP Operating System. Visual Basic Script, also known as VBS, does not require any installation or setup and can be run directly from the command line. For example, the following script could be used to automate a two-second capture and print the number of bytes when it is done:
	Set WshShell = WScript.CreateObject("WScript.Shell")
	Set myApp = CreateObject( "EtherPeek.Application" )
	Set myDoc = myApp.Documents.Open(
	     WshShell.CurrentDirectory + "\ethernet.ctf" )
	myDoc.IsCapturing = True
	WScript.Sleep 2000
	myDoc.IsCapturing = False
	nBytes = myDoc.SummaryGetEntry("Total Bytes", "Network" )
	WScript.Echo "Bytes = " & nBytes
	myDoc.Close
To run this script yourself, first create a folder to work in like c:\auto. Next, save the code above to a file called ethernet.vbs, in the c:\auto folder. Now run Omnipeek yourself, create a capture using your local ethernet adapter and save the capture a template called c:\auto\ethernet.ctf. This capture template is the file specified in the Open() function in the VBS script. Finally, open a DOS command window and cd to the c:\auto folder. From there type "cscript ethernet.vbs". cscript is the built-in VBS interpreter. From here, you are undoubtedly going to start brainstorming on the many ways you can extend this simple script to automate many of the labor intensive tasks you currently perform by hand over and over. That's good, but first take a few minutes and read through the rest of this primer.
For more information on the Console Automation API, refer to the Console Automation Reference. For more script samples, in different languages, check out the Console Automation Sample Page.
Engine Automation
If you ran the script above, you saw the Omnipeek Console come up, create a capture, run the capture, and then Omnipeek went away. This is because the Console automation API literally automates the functions of the Console. This emulates the actions on the screen that a human operator would perform. There are many processes that can be automated in this way. However, for non-UI automation, increased robustness and security, and infinitely more complex applications, the Engine Automation API should be used.
The Engine Automation API is run against an Capture Engine. The Capture Engine can be on the same machine as the automation script or on a machine that is somewhere else on the network. The Engine Automation API is a collection of functions provided in a library called OmniScript. The OmniScript library in turn communicates with an Capture Engine through a network protocol known as PeekDNX. The protocol can be configured with encryption as well as compression.
To get started with the Engine Automation API, simply download and install the OmniScript Library. The OmniScript API requires that an Capture Engine be installed on the network somewhere that is accessible by the script. Once the OmniScript library is installed, create a folder called c:\auto. Next, create a file called remote.vbs and copy the following code into it.
	Set theEngine = CreateObject("EPRCmdAPI.WPRemoteCmdMgr")
	call theEngine.Connect( "localhost", 6367, 30000 )
	Set theAdapterList = theEngine.GetRemoteAdapterList
	theAdapterName = theAdapterList.Item(0).Description
	captureGUID = theEngine.CreateNewCapture( "AutoCapture",_
	     False, False, 0, False, 0, False, 0,_
	     False, 0, 32000, theAdapterName )
	theEngine.StartCapture(captureGUID)
	WScript.Sleep 2000
	theEngine.StopCapture(captureGUID)
	Set theNodeList = theEngine.GetNodeListAll( captureGUID )
	nBytes = 0
	For i = 0 To theNodeList.Count - 1
	     Set theNodeStat = theNodeList.Item( i )
	     nBytes = nBytes + theNodeStat.BytesSent
	Next
	WScript.Echo "Bytes = " & nBytes
	theEngine.DeleteCapture(captureGUID)
Like the console script, this is run using cscript.exe on the DOS command line. This script connects to an engine running on the same machine as the script, gets the adapter list, creates a new capture, runs it for a few seconds, gets the node list, loops through the node list adding up the bytes, and finally prints out the number of bytes before deleting the capture. In the sample script above, we do not need a capture file; however, we could use one if we wanted to.
For more information on the Engine Automation API, refer to the Engine Automation Reference.
In both script samples, lots of error checking should be added along with comments, but these details will be left as an exercise for you, the scripting guru. For my part, I am done for now. I hope this primer on automation has been helpful to you.