You must be a MyPeek member to download our extensibility solutions. Click here to learn more about the benefits of membership and find out how to sign up for free.
If you are not a LiveAction Maintenance Customer but would like to purchase a Maintenance contract for your LiveAction product please click here for sales information.
Category : Tools
Submitted By : Savvius
Downloaded : 56 Times
Rating : 3 of 5
View Comments (0)
Extend the functionality of the OmniEngine with plug-ins. Get started on an OmniEngine Plug-in quickly with the OmniEngine Plug-in Wizard 2. This version supports C++11 and Linux.The OmniEngine Plug-in Wizard is an extension to Microsoft Visual Studio 2013 that generates source code and project files, which when built produce a functional OmniEngine plug-in with sample source code.
The resulting plug-in consists of a .dll and .he file. The plug-in will run in both OmniPeek (the console) and OmniEngine (the engine).
On the console, the plug-in will provide a UI for an About box and for setting options. These options can be applied directly to a capture, or saved in a capture template and used later or through an automated script. For more in scripting, please checkout OmniScript.
On the engine, the plug-in will process and analyze packets based on the options provided through the UI.
To use the plug-in wizard, first run the installer. Then, in Visual Studio, create a new project and choose "OmniEngine Plugin 7". A dialog will appear with options for different types of events and if sample code is included. Below is the options dialog:
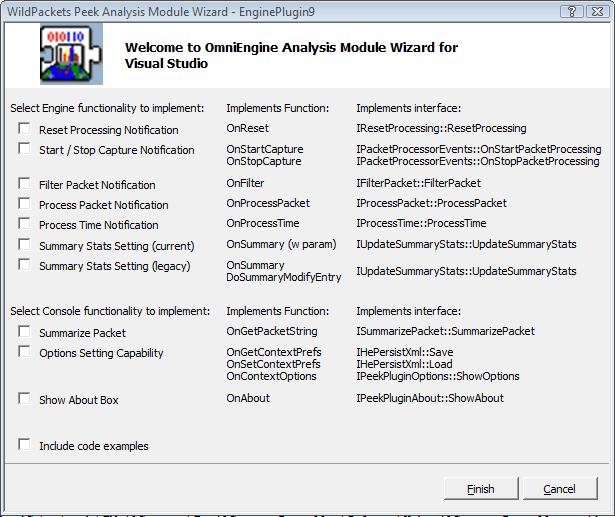
Choose the ones you want, and hit OK. When the Wizard is done, build your new plug-in.
When the plug-in is done building, it will be copied to the OmniEngine Plugins folder and OmniPeek Engine Plugins folder. If your OmniEngine and OmniPeek are on different machines, you will have to copy the .dll and .he files there yourself.
Now run OmniPeek, connect to your OmniEngine and a create a new capture. Select the Analysis Options View of the Capture Options Dialog. Select Analysis Modules click the Details button (or double-click on Analysis Modules) and your new plug-in should be listed in the Analysis Modules dialog. Select your new plug-in and click the About and Options buttons. Read about your plug-in in the About box and select the settings for your plug-in in the Options dialog. When you start the capture, your plug-in should be running on the engine, processing packets, and doing all of the amazing things that you told it to do,
History
Version 8.0 3/23/15
- Added supports Omni 8.0 on Windows and Linux.
- Added to MyPeek